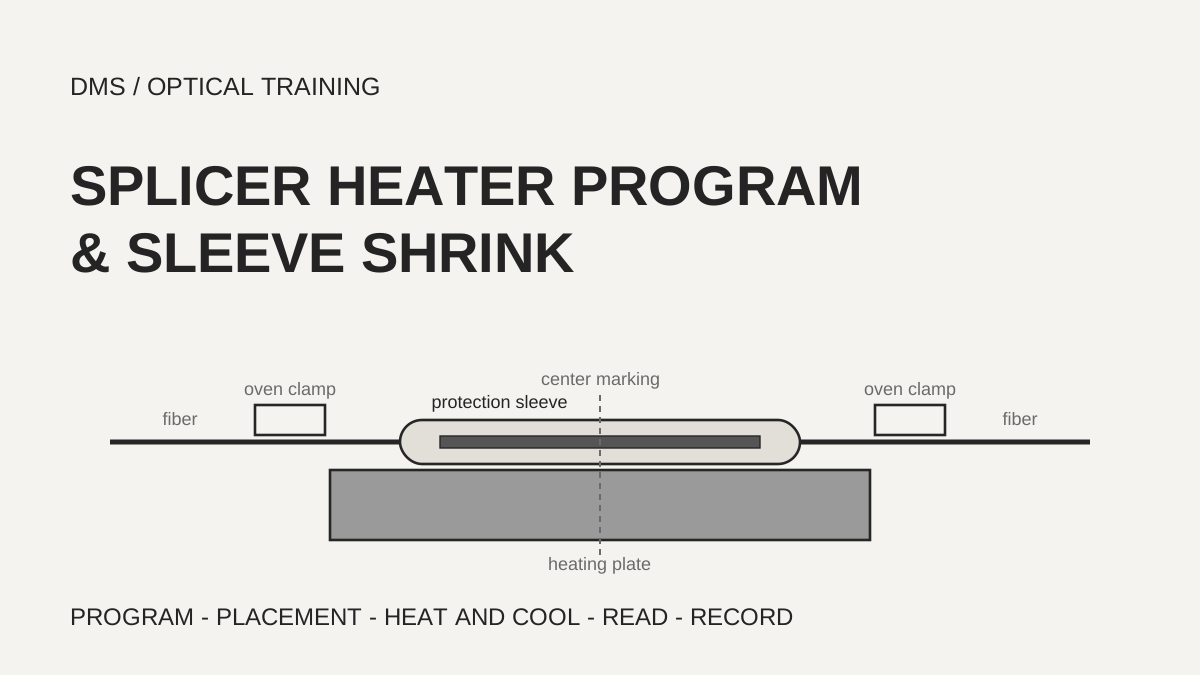
A splicer heater oven is checked in this order: choose the heater program that matches the sleeve type, place the sleeve at the center of the oven, wait for the signal that heating and cooling have finished, then look at the shape of the shrunk sleeve. Heating time and temperature are stored in programs the manufacturer builds for each sleeve part number, so the program is not chosen by length alone, and Fujikura notes that a sleeve from another company needs its own settings. The lid and clamps stay closed during heating, and when a result looks wrong the position is checked first and only one setting is changed at a time.
Based on the manufacturer manuals reviewed on October 29, 2026.
Learning objectives
-
Explain that heater programs are built around the sleeve part number and length, and state the basis for choosing the right program.
-
Find in the manuals the placement of the sleeve, auto start and how to stop heating, and read them as one work sequence.
-
Pick the first item to check from the shape of a shrink result, and state the items to record when a setting is changed.
What does the heater oven of a splicer do?
The heat shrink oven is the part that shrinks the protection sleeve placed over a spliced fiber with a heating plate, which reinforces the splice. The Sumitomo TYPE-82C+ manual shows the oven as a heating plate, a lid and oven clamps that hold the fibers straight, and introduces dual independent ovens at the front and the rear so that consecutive splices have no waiting time. The same manual says the protection sleeve must be slipped over the fiber before splicing and cannot be installed afterward.
The heating result is also tied to splice loss. Sumitomo says that taking the sleeve out of the oven before the heat cycle is complete leaves less cooling, which can bend or twist the fiber and raise splice loss. The Fujikura 90S manual says a hot shrunken sleeve deforms easily and can leave residual stress, meaning internal force that stays in the splice, at the splice point, and tells the operator to use the cooling plate called the J-plate. What the two documents share is that the heating time includes cooling. How much the loss rises is not given as a number in the documents read.
-
The heater oven shrinks the sleeve and reinforces the splice
-
The sleeve must be slipped on before splicing
-
The manufacturer says that taking the sleeve out before cooling ends can raise loss
On what basis is a heater program chosen?
All three manufacturers keep a separate heater program for each sleeve. The Fujikura 90S manual says each tube heating mode is optimized for a type of Fujikura protection sleeve, and tells the operator to copy a mode from the database area and paste it into the user-programmable area, whose modes the operator can edit. The list contains the standard 60 mm and 40 mm sleeves, small 15 mm and 20 mm sleeves, a 60 mm sleeve for drop cable and slim types, and each mode names the sleeve part number it is meant for.
Sumitomo keeps separate programs for 0.25 mm and 0.9 mm coating diameters on the 60 mm and 40 mm sleeves, and adds variants for the same sleeve. Quick warms the oven to a pre-heating temperature as soon as splicing finishes so the heating cycle is shorter, and ECO increases the number of heat cycles per battery charge. The slim 60 mm group also has programs whose heating duration is 5 seconds longer or 5 seconds shorter. The Furukawa S185 manual lists 15 programs installed at the factory, including programs for sleeve part numbers such as S921, S922 and S928, OTHER programs that specify only the sleeve length, POWER versions with pre-heating, a continuous heating program, and CURL REMOVE for straightening a curled fiber.
A sleeve from another company has to be read separately. The Fujikura 90S manual says to set the parameters for the specific sleeve when a non-Fujikura protection sleeve is used, and that the durability of the protection point cannot be warranted with another company's sleeve. Sumitomo also says that the applicable protection sleeves vary with the cleave length. As a DMS reading, programs are not swapped just because the sleeve length matches; the sleeve part number is first checked against the program description in the manual.
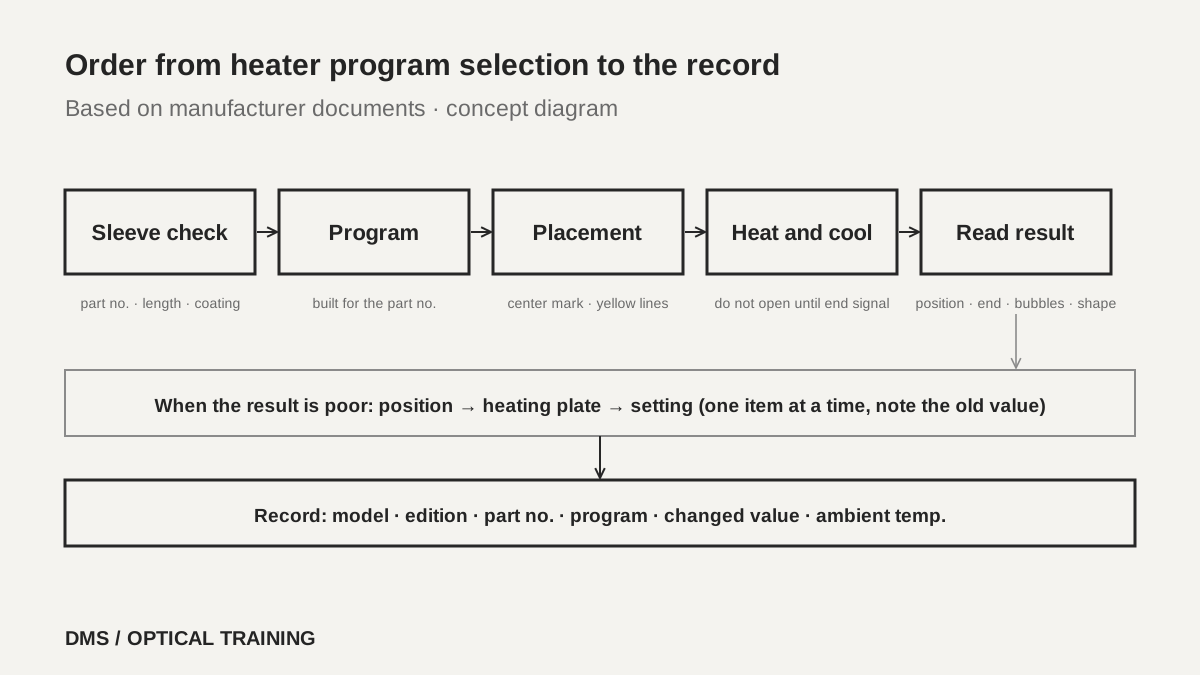 Check sequence from heater program selection to the recordView original
Scroll horizontally to view a wide table.
| Source | Basis for choosing a program | Variants the document lists |
|---|---|---|
| Fujikura 90S manual | Fujikura sleeve part number and length, target coating diameter | Slim types, drop cable type, copy to the user area |
| Sumitomo TYPE-82C+ | Sleeve length, coating diameter of 0.25 mm or 0.9 mm, slim types | Quick, ECO, heating time plus or minus 5 seconds |
| Furukawa S185 | Sleeve part number and length | POWER pre-heating, continuous heating, curl removal |
-
Programs are built around the sleeve part number
-
A program is not swapped just because the length matches
-
Fujikura notes that another company's sleeve needs its own settings and cannot be warranted
Where is the sleeve placed, and when are the hands released?
Position comes first. The Sumitomo oven has a center marking, and the manual says to lower the fibers using the 60 mm and 40 mm markings as a reference. The spliced fiber is taken out without flexing it, the sleeve is slid to the center of the splice, and with slight tension kept on the left and right fibers the fibers are lowered onto the oven, after which the lid and the clamps close together. Fujikura says the sleeve may not shrink completely if it is not centered between the yellow lines, and Furukawa says a sleeve placed in the wrong position can cause a shrinking error. For a drop cable splice Sumitomo says the sleeve must be centered over the splice and overlap the cable sheath by at least 5 mm at each end.
When the hands are released differs by document. The main text on page 44 of the Fujikura 90S manual says to keep applying tension until the heater lid closes automatically, and that releasing earlier may move the sleeve from its proper heating location. The note box on the same page says to apply tension until the heater holds the fiber and to release tension before closing the lid, and the troubleshooting page says not to remove the hands until the heater cover closes and the buzzer sounds. The three sentences seem to point to different moments, and how they fit together could not be confirmed. For that reason the moment of release follows the manual and the on-screen guidance of the model in use.
The way heating starts also differs. Sumitomo says heating starts when the fiber is placed in the oven if Auto start heating is on, while Furukawa says the HEAT key is pressed to start when auto start is off, and that with auto start on the heater starts when the fiber is set and the left clamp is shut. Furukawa also notes that the coating may melt if the sleeve is left in the heater after it has shrunk. To stop heating, Fujikura 90S says to press the HEAT key twice because the RESET key does not cancel the heater, and Sumitomo says to press the heater key again. Furukawa says that pressing the indicated key while the HEAT LED is lit stops the heating at once.
Scroll horizontally to view a wide table.
| Source | Placement reference | Start and stop of heating |
|---|---|---|
| Fujikura 90S manual | Center between the yellow lines | Lid closes automatically to start; HEAT key twice to stop |
| Sumitomo TYPE-82C+ | 60 mm and 40 mm center markings on the oven | Starts on placement if auto start is on; heater key to stop |
| Furukawa S185 | Position specified for each sleeve length | Starts by the auto start setting; indicated key to stop during heating |
-
The sleeve is placed at the center of the splice
-
The moment to release tension follows the manual of the model in use
-
The lid and clamps are not opened during heating
What changes the heating time and temperature?
The heating time includes cooling. The Fujikura 90S manual defines Heat Time as the time from the start of heating to the end of cool-down, and says it is adjusted automatically with atmospheric conditions such as ambient temperature, so it can be longer or shorter than the value set. Furukawa says that when the ambient temperature is lower than 10°C, the heating time is extended automatically by approximately 5 to 20 seconds. As a DMS reading, when heating runs longer than usual in a cold place, the manual is checked for such automatic adjustment before the machine is treated as faulty.
The structure of a program differs by maker. Sumitomo lists pre-heating temperature and time, heat up temperature A with heating duration A, heat up temperature B with heating duration B, a finish temperature and an additional cooling finish temperature, while Furukawa lists first and second temperatures and times for each of the inner and outer heaters, plus pre-heating and cooling temperature and time. This lesson does not write any actual temperature value, because model-specific values were not confirmed in the pages read. In the Sumitomo table, the Operator column shows both view and edit for the heating temperatures, durations and finish temperature, while the program name and sleeve name are visible and editable only for the administrator. That is why it is worth confirming who can change the values on site. Fujikura also notes that parameters in the heater mode may be added or changed with a software upgrade.
Sleeve length and the prepared fiber length are paired as well. In the Fujikura table, the 60 mm FP-03 sleeve is listed with a prepared fiber length of 16 mm or less, the 40 mm sleeves with 10 mm or less, the 15 mm sleeve with 5 mm or less and the 20 mm sleeve with 6 mm or less. The Sumitomo table likewise lists FPS-1 at 60.5 mm with a recommended cleave length of 16 mm and FPS-40 at 40.5 mm with 10 mm. The terms differ, prepared fiber length in one and cleave length in the other, so whether they mean the same length was not confirmed. Fujikura also says the diameter after shrinking varies with the diameter of the fiber.
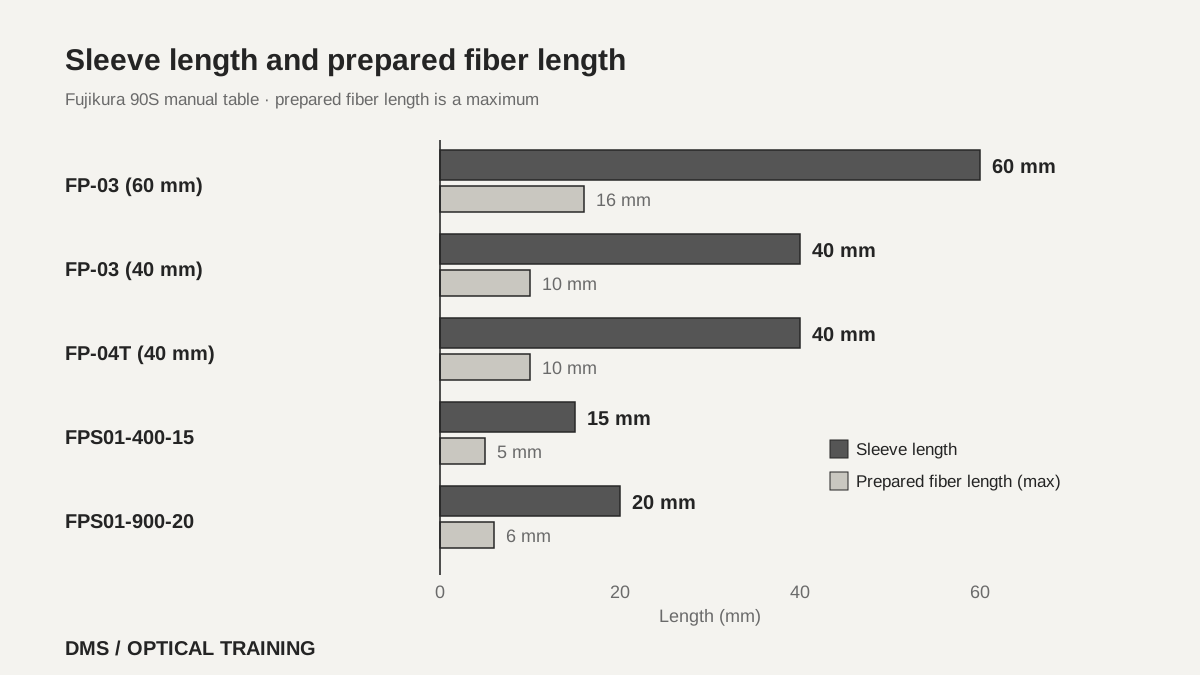 Sleeve length placed next to prepared fiber length in the Fujikura tableView original
Scroll horizontally to view a wide table.
| Sleeve | Length and prepared fiber length | Diameter after shrink and target coating |
|---|---|---|
| FP-03, stainless steel tension member | 60 mm, 16 mm or less | About 3.1 mm, 250 to 900 µm |
| FP-03 40 mm, stainless steel tension member | 40 mm, 10 mm or less | About 3.1 mm, 250 to 900 µm |
| FP-04T, glass ceramic tension member | 40 mm, 10 mm or less | About 4.0 mm, 250 to 900 µm |
| FPS01-400-15 | 15 mm, 5 mm or less | About 1.5 mm, 400 µm or less |
| FPS01-900-20 | 20 mm, 6 mm or less | About 2.3 mm, 900 µm or less |
-
Heating time includes cooling and is adjusted automatically with ambient temperature
-
Who can change the values, and the value before the change, are confirmed
-
Sleeve length and prepared fiber length are looked up in the table of the model in use
How are the shrink result and the heating plate read?
The result is judged by taking the sleeve out and looking at it. The Sumitomo manual shows four faulty shapes: a sleeve not centered over the splice, a bend in the bare fiber, an incompletely shrunk sleeve with a flared trumpet end, and bubbles on the bare fiber. Fujikura says to check after heating that there are no bubbles, debris or dust in the sleeve, and that when the sleeve does not shrink completely, the operator should check that it sits centered between the yellow lines and extend the heating time. Furukawa compares normal heating, excessive heating and insufficient heating in pictures and says to decrease the heating temperature for excessive heating and to extend the heating time for insufficient heating.
Furukawa also has Shrink Sleeve Adjustment in the settings menu. The operator selects the picture most similar to the current sleeve and the heating condition is adjusted. The choices are not shrunk enough at the sleeve end, bubbles in the sleeve center, fiber coating melts, sleeve melts too much, and a return to the factory setting. The manual says to repeat the operation if the adjustment is insufficient.
Scroll horizontally to view a wide table.
| Observation | Direction the document points | Source |
|---|---|---|
| Sleeve off center | Check placement and markings | Fujikura, Sumitomo, Furukawa |
| End not fully shrunk | Check position, then extend heating time | Fujikura, Furukawa |
| Excessive heating, melted coating or sleeve | Lower the heating temperature or use shrink adjustment | Furukawa |
| Bubbles | Classed as a faulty shape and listed as an adjustment item; cause not in the document | Sumitomo, Furukawa |
| Bent bare fiber | Classed as a faulty shape only; cause not in the document | Sumitomo |
The heating plate is checked together with the result. Sumitomo says dirt and dust accumulate in the oven easily, so the heating plate is cleaned regularly with a dry cotton swab, and the oven clamps are cleaned with a swab moistened with alcohol and then with a dry swab to remove moisture and alcohol. Fujikura says that when a sleeve sticks to the heating plate it is pushed off with a soft tip such as a cotton swab, and that the user should contact the authorized distributor if the black coating comes off. When the heater temperature does not reach the setting, the LED blinks and an alarm sounds, and the manual again tells the user to contact the distributor. Furukawa says to stop using the splicer if the sleeve heater has a problem, turn off the power, disconnect the power cord, remove the battery and contact the local service center, and warns against touching the heater element during and right after heating. This lesson does not judge such faults and only passes on the action the manufacturers describe.
-
The result is read in the order of position, end shape, bubbles and deformation
-
Position and heating plate are checked before any setting is changed
-
The heating plate is not touched during or right after heating
How is the order set in a hypothetical case?
The situation below is assumed for teaching and is not a real site or measurement. Suppose the same sleeve part number is used the same way every time, but one end of the sleeve is not fully shrunk and bubbles are sometimes seen. If the heating time is extended at once, it can no longer be told whether the cause was position or setting. This order is a DMS reading.
The order is set like this. First, check that the sleeve part number and length match the description of the selected program, and that the sleeve is not from another company. Next, check whether the sleeve sat on the center marking or between the yellow lines. If the work place is cold, look in the manual for automatic extension of heating time. If the heating plate shows dust or sticking marks, clean it. Only when the problem remains is a setting changed: Fujikura says to extend the heating time and Furukawa offers the shrink adjustment menu, and in either case only one item is changed at a time and the value before the change is written down. If the symptom stays or the heater does not reach its set temperature, the manufacturer's service guidance is followed.
-
Program, sleeve part number, position and heating plate are checked first
-
Only one setting is changed at a time and the previous value is written down
-
If it does not clear, it goes to the manufacturer's service guidance and is not judged in this lesson
What is recorded when the heating check is finished?
The record holds the splicer model and manual edition, the sleeve part number and length, the name of the heater program used, the changed value and the value before the change, and the ambient temperature of the work place. The shrink result is written as position, end shape, bubbles and deformation, and if the heating plate was cleaned the date is added. Writing down how many heats were made with a changed value makes it possible to separate the effect of the change later.
What was not confirmed is also recorded. These materials are limited to three manufacturer manuals and no standard text was read. Model-specific heating temperature values, the tensile strength of the splice after shrinking, and the size of the effect of the shrink condition on loss have no numbers in the pages read. Whether the sentences about the moment of tension release in the Fujikura 90S manual agree with each other was also not confirmed. It was not confirmed whether the methods in this lesson can be carried over unchanged to another model or to another company's sleeve, so the manual of the model in use is attached as the source for every item.
-
Model, edition, sleeve part number, program name and changed values are written together
-
The shrink result is written as position, end, bubbles and deformation
-
Conditions that were not confirmed are recorded as not confirmed
Checklist
-
Do the part number and length of the sleeve in use match the description of the selected heater program?
-
Was the sleeve placed on the center marking or the specified position, and did the release of tension follow the manual of the model in use?
-
Were the lid and clamps kept closed until the end signal, and was the removed sleeve cooled?
-
Was the shrink result read as position, end shape, bubbles and deformation, and was only one setting changed at a time?
-
Were the model and edition, program name, changed value and previous value, and heating plate cleaning recorded?
Review questions
1. If the sleeve length is the same, may any heater program be used?
Answer and explanation: No. Programs are built around the sleeve part number. The Fujikura 90S manual says each mode is optimized for a type of Fujikura sleeve, and that another company's sleeve needs separate settings and its durability cannot be warranted. The sleeve part number is first checked against the program description.
2. What happens if the lid or clamps are opened during heating, or the sleeve is taken out before heating ends?
Answer and explanation: Furukawa says opening the heater clamp or lid during heating may cause a shrinking error, and Sumitomo says taking the sleeve out before the heat cycle is complete leaves less cooling, which can bend or twist the fiber and raise splice loss. The operator waits for the end signal.
3. What is checked before a setting is changed when the shrink result is poor?
Answer and explanation: The sleeve part number and program, the placement, the ambient temperature and the condition of the heating plate are checked first. If a change is still needed, Fujikura says to extend the heating time and Furukawa says to lower the temperature for excessive heating and extend the time for insufficient heating, with one item changed at a time and the previous value recorded.
Sources
-
Fujikura: Instruction manual Core Alignment Fusion Splicer 90S · marked RevT1, a copy hosted by a third party, pages 31 to 32, 44, 67 to 70 and 97
-
Sumitomo Electric: TYPE-82C+ Guide to operation · OME2024078-3 ver.1.01, pages 1-2, 1-6, 2-10, 2-17, 2-21 to 2-22, 2-28, 3-4 and 5-1 to 5-6
-
Furukawa Electric: S185 Series Fusion Splicer User Manual · FTS-B562 Issue 16, section 5.2.7 (page 45), section 6.4.10 (pages 80 to 82), section 7.2.5 (page 103) and the heater program parameter table (page 124)