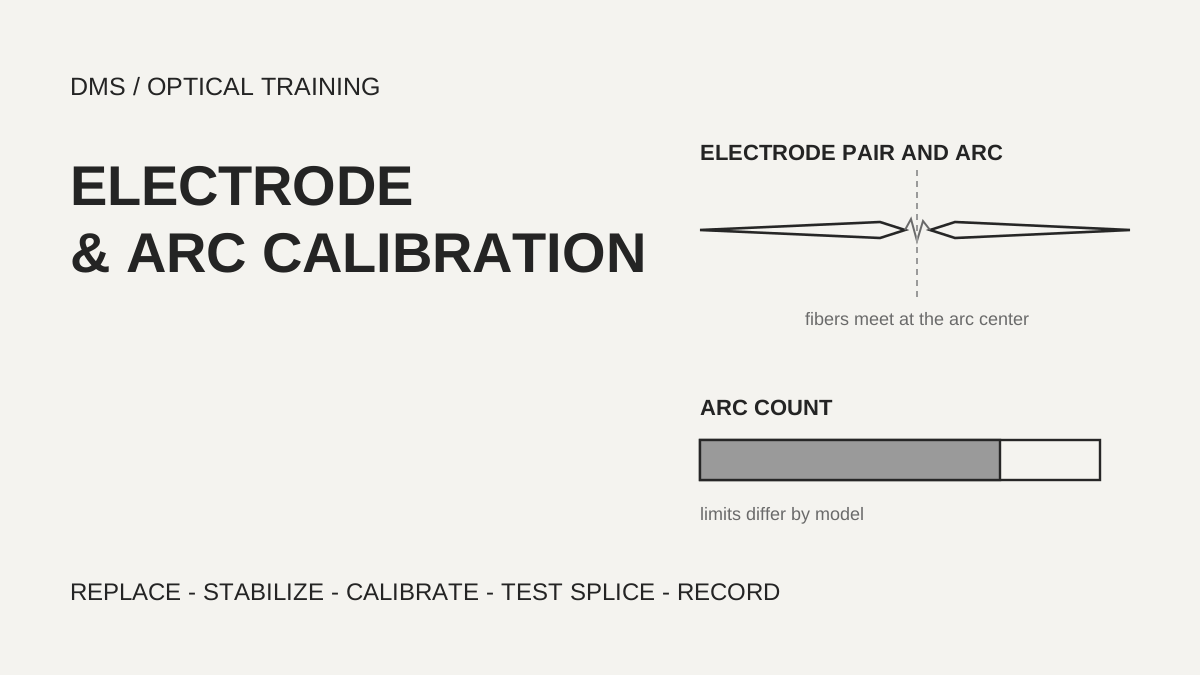
The point at which electrodes should be replaced depends on the manufacturer and model, so read the warnings on the splicer in use together with the splice symptoms before deciding. Fujikura gives 5,000 fusings for the 90S+, Sumitomo gives about 6,000 arc discharges for the TYPE-82C+, and the Fujikura 70S+ lets the user set the warning count. After replacement, finish the stabilizing discharges and arc calibration (the step that sets arc power and arc position), then confirm with a test splice before returning to field work.
Based on the manufacturer manuals and technical pages reviewed on October 26, 2026.
Learning objectives
-
Read electrode replacement criteria that differ by manufacturer in three parts: on-screen warnings, discharge counts and splice symptoms.
-
State, in order, the safety points and the installation checks for replacing electrodes.
-
Separate the order of stabilizing, arc calibration and test splicing, and the differences between models.
After how many discharges are electrodes replaced?
There is no single number; each manufacturer states its own count per model. Fujikura recommends replacing the 90S+ electrodes after 5,000 fusings and explains that worn electrodes degrade the fusing condition and raise splice loss. The Sumitomo TYPE-82C+ guide says electrodes typically need replacing after about 6,000 arc discharges. Once the arc count passes 5,000 it is highlighted in yellow with a message that the electrodes need changing soon, and once it passes 6,000 a warning appears at every power-on until the electrodes are replaced.
The Fujikura 70S+ manual does not lead with a fixed number and leaves it to a setting. When the count reaches the set value, a message prompting electrode replacement appears right after power-on, and when the warning value is exceeded the caution message changes to a warning message. The default numbers for these two values were not confirmed in the pages read for this lesson. The Sumitomo guide also says the counts at which the caution and warning appear can be edited in administrator mode. So in the field, check what caution and warning values are set on that splicer before relying on any representative number from a manual.
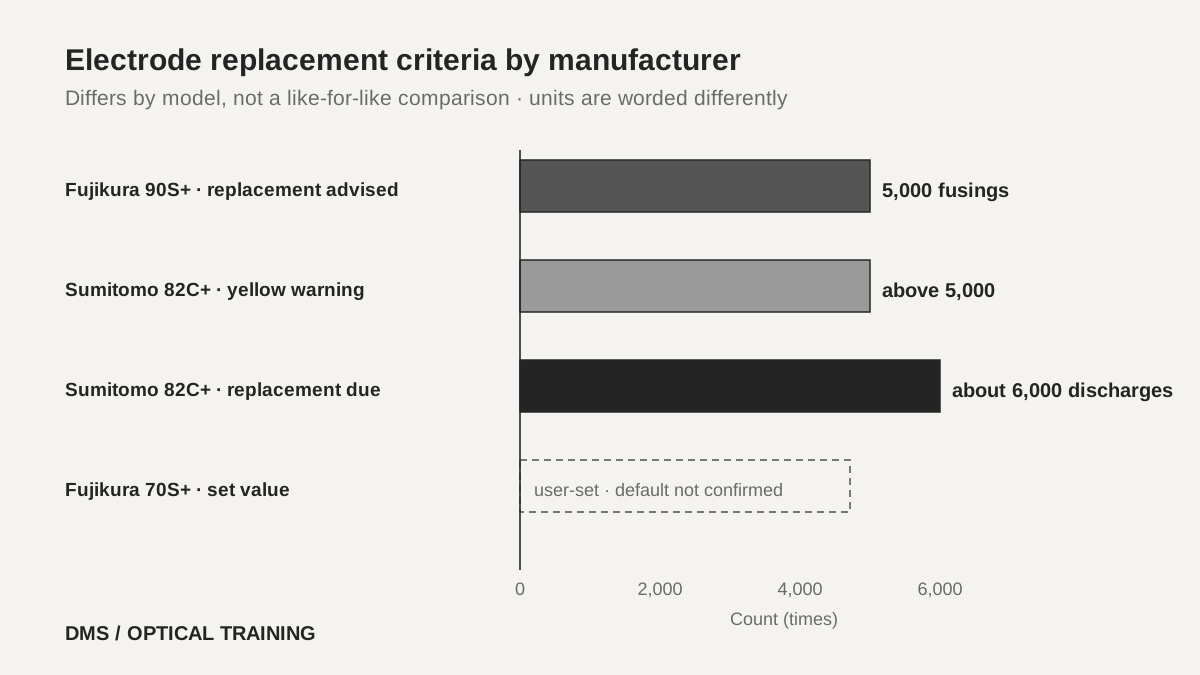 Electrode replacement criteria differ by modelView original
Scroll horizontally to view a wide table.
| Document | Replacement criterion | Applies to |
|---|---|---|
| Fujikura 90S+ technical page | Replacement recommended after 5,000 fusings | 90S+ |
| Sumitomo TYPE-82C+ guide | About 6,000 discharges, yellow warning above 5,000 | TYPE-82C+ |
| Fujikura 70S+ manual | Message at a user-set count | 70S+ |
-
The replacement count differs by model and is not one fixed number
-
Caution and warning values can be changed in settings, so check them first
-
The numbers in this table belong to each manufacturer's document and are not moved to other equipment
Besides the count, which symptoms signal replacement?
Splice condition sends signals before the count is reached. The Fujikura 90S+ page lists three occasions for replacement: when the screen prompts replacement, when the fusing position moves unstably from side to side or becomes too dark or too bright during discharge, and when the screen shows a Too left fusing error or Too right fusing error. The troubleshooting section of the Sumitomo guide lists high or inconsistent splice loss, bubbles in the fibers after splicing, diameter faults, a fluttering or unstable arc on the monitor, a fiber burned in half, and a sizzling noise while arcing.
A symptom does not by itself prove electrode wear. The Sumitomo error list says an unstable arc error can also come from electrodes installed incorrectly, and it advises that when fibers break in the proof test after splicing you should redo the arc test, and if they still break, clean the V-grooves and the cleaver. So when a symptom appears, do not suspect only the electrodes; keep installation, cleaving and cleanliness open as causes. The symptom table in the Fujikura 70S+ manual points to arc calibration for a Thin error and to motor calibration and an overlap adjustment for a Fat error, so even similar splice defects have different causes and remedies.
One more point about reading the count. The Sumitomo guide describes the replacement point as arc discharges in one place and as splices in the troubleshooting section. You cannot assume exactly one discharge per splice, so first check what the counter on the screen counts, and use that name when you record it.
-
Look at the message, the arc shape and the spread of splice loss together
-
Do not conclude electrode wear from a symptom alone
-
Check whether the counter counts discharges or splices
What do you keep in mind when replacing electrodes?
First, switch the power off safely. The Sumitomo guide says to turn the splicer off and unplug the power cord or remove the battery before replacing electrodes, and warns of electric shock otherwise. The Fujikura 90S+ page says to use the electrode replacement item in the menu and switch off as instructed, and that switching off with the power switch directly means the splicer does not guide you through replacement. The two documents differ, so follow the procedure for the model in use.
Electrode tips are sharp and sensitive. Sumitomo says nothing should touch the electrode tips and explains that a tip that touches something is deformed and gives poor arcing. It also says not to clean the electrodes, because cleaning can make the arc unstable. It tells you to replace genuine electrodes as a pair. The Fujikura 90S+ page likewise says not to bend the electrode tips.
Checking the installation is part of the procedure. Sumitomo says to confirm that the protrusion of the electrode cover fits the splicer, that the two electrode tips face each other at the same height and that the thumbscrew is fully tightened, and warns that wrong installation can make splice performance unstable or partly damage the splicer. The Fujikura 90S+ page explains that an electrode that is not seated properly sits higher than the other and its rod tip looks shifted. The Fujikura 70S+ manual says to tighten the electrode holder screw to 20 cNm and make sure the electrodes are attached firmly; that value is the tightening reference for that model.
-
Switch the power off by the procedure of that model
-
Do not touch or clean the electrode tips, and replace them as a pair
-
After installing, check the protrusion, the height and the screw tightening
In what order do you stabilize and calibrate after replacement?
Do not start splicing right after new electrodes are installed. In general, the new electrodes go through a step that settles the discharge and a step that sets arc power and position, and then a test splice confirms the result, but the names and counts differ by manufacturer. The Fujikura 90S+ page says that after replacement the electrode stabilization screen appears at power-on, that you load cleaved fibers and finish stabilizing, and that you then run fusing power calibration. The Fujikura 70S+ manual says to run arc calibration once after replacement, that the splicer then repeats arc discharges to stabilize the electrodes, and that you run arc calibration again and repeat until the Test Finish message appears.
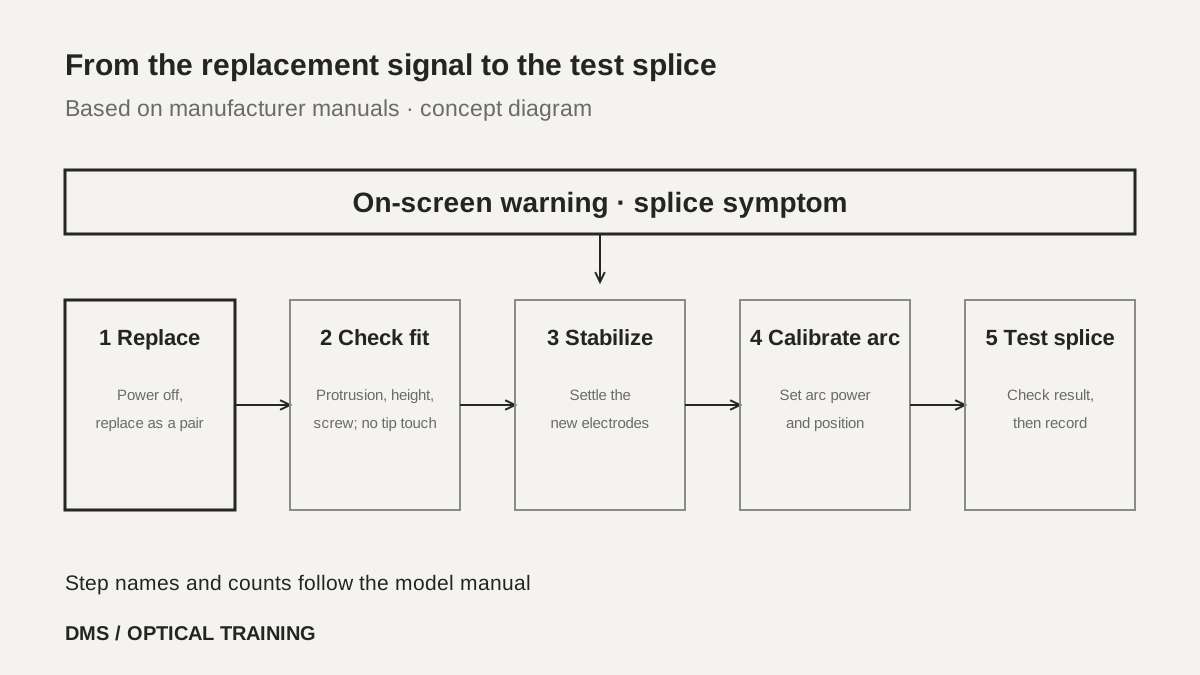 From the replacement signal to the test spliceView original
The Sumitomo TYPE-82C+ guide says that if you splice right after replacement the splicer cannot adjust the arc center position automatically and gives an error, so run an arc test first. It also has a conditioning arc function for new electrodes, and the arc count is reset automatically once that function has been performed. The older Fujikura 41S manual writes 30 successive discharges for stabilizing, but that is a value for that model and is not used as a reference for others.
So when you describe the procedure, look at the purpose of each step before its name. Stabilizing and conditioning can be read as steps that settle the new electrodes, and calibration and the arc test as steps that set arc power and position. That is DMS's interpretation, not something the manufacturers describe as the same function. The real order and counts follow the manual of the model in use.
-
Do not splice right after replacement
-
The order and counts of stabilizing and calibration follow the model manual
-
Return to field work after checking the test splice result
Is arc calibration only for replacement?
It is not only for replacement. The Fujikura 70S+ manual says the splicer's temperature sensor holds arc power constant against changes in temperature, humidity and pressure, but changes in arc power caused by electrode wear and glass adhesion are not corrected automatically. The arc center position can also drift to the left or right, so arc calibration is needed to resolve both. The same manual says calibration happens automatically in the automatic mode so you need not run it separately, that you should run it before using a mode other than automatic, and that it is recommended for the first splice after long storage.
Sumitomo takes the same view. It says the automatic mode of the TYPE-82C+ analyzes and calibrates arc power at each splice so an arc test is normally unnecessary, and then lists the cases to run it: poor splice performance, after electrode replacement, and after large changes in temperature, humidity or air pressure. The Fujikura 70S+ manual adds that after a sudden environmental change, such as moving the splicer from a low altitude to a high one, the arc can take time to settle; in that case use the electrode stabilization function and always run arc calibration afterwards.
Calibration has its own conditions. The same manual says to use standard single-mode fiber (ITU-T G.652) for arc calibration and well-prepared fibers, because dust on the fiber affects the result. The cleave angle threshold used for calibration is set independently of the cleave limit in the splicing modes. The results are Good when calibration ends well and Not Adequate when the change from the previous calibration is so large that further calibration is strongly recommended, and some cases need several rounds before Test Finish appears. A fiber with a poor cleave makes the result hard to trust, so read this together with the earlier lesson on reading cleave angle.
-
Wear and glass adhesion are not corrected automatically
-
Consider calibration also after a sudden environment change or long storage
-
Use standard single-mode fiber with a good cleave for calibration
How is a hypothetical case judged?
The situation below is hypothetical for teaching and is not a real site or measurement. Suppose the discharge count on a splicer has reached the caution display and splice loss has been uneven for two days. The temptation is to reset the count only, because the warning disappears and the problem looks solved. In the documents read for this lesson, the count reset is either part of the electrode replacement function or a separate item, such as clear arc count on the Fujikura 70S+ and reset arc count on the Sumitomo. Either way it only returns the counter to zero and does not change the electrodes, so it is DMS's interpretation that resetting the count alone changes only the display while the electrode condition stays the same.
So the order is set as follows. First record the warning, the spread of splice loss and the arc shape. Next check the cleave, the V-grooves and the cleaver to rule out other causes. Then check the electrode installation height and screws, and if replacement is needed, replace the pair together and finish stabilizing and arc calibration by the model's procedure. Finally run a test splice and leave the result message and the estimated loss in the work record.
-
Resetting the count alone does not change the electrode condition
-
Rule out other causes before moving to replacement and calibration
-
Leave the test splice result in the record
What do you record when the job ends?
Record the replacement date and the discharge count at that time. Both the Fujikura 70S+ manual and the Sumitomo guide distinguish the count that is reset after replacement from the total count that cannot be reset, so write the two values separately. Also record whether the replacement electrodes were a genuine pair, which message appeared when stabilizing and calibration finished, how the test splice turned out, and whether the environment changed greatly in altitude or temperature. The record should let the next worker avoid making the same judgment from scratch.
The record should also state what was not confirmed. The documents reviewed are manufacturer documents, and no requirement from a standard was confirmed. Whether the replacement counts in the manuals are typical values and whether the real replacement point varies with the operating environment was also not confirmed from these documents. No test was reproduced on real equipment. So record the replacement count with the manual of the model in use and the screen setting as its source.
-
Record the replacement count and the total count separately
-
Write the result messages of stabilizing and calibration with them
-
Leave unconfirmed conditions as unconfirmed
Checklist
-
Did you check the caution and warning values of the discharge count on the splicer in use?
-
When a symptom appeared, did you check cleaving, cleaning and installation, not only the electrodes?
-
Did you power off by the model's procedure, replace the electrodes as a pair and avoid touching the tips?
-
Did you check the height, the protrusion and the screw tightening, and finish stabilizing and arc calibration?
-
Did you record the replacement date, the discharge count, the calibration result and the test splice result?
Review questions
1. Why should the replacement point not be memorized as one number?
Answer: Each manufacturer and model gives its own guidance. The Fujikura 90S+ gives 5,000, the Sumitomo TYPE-82C+ about 6,000 and the Fujikura 70S+ a set value. Symptoms such as an unstable arc, left or right errors and uneven splice loss are also signals, so check the screen settings and the manual together.
2. What should you observe when replacing electrodes?
Answer: Power off by the procedure of the model, do not touch or clean the electrode tips, and replace genuine electrodes as a pair. After installing, check that the protrusion is engaged, that the two tips are at the same height and that the screw is tightened.
3. Why should you not start field splicing right after replacement?
Answer: New electrodes need the process that settles the discharge and sets arc power and position. The Sumitomo guide says that splicing right after replacement cannot adjust the arc center automatically and gives an error. Finish stabilizing and calibration, then confirm with a test splice.
Sources and versions
-
Fujikura: How to replace the electrode of 90S+ · no date shown on the page
-
Sumitomo Electric: TYPE-82C+ Guide to operation · marked document number OME2024078-3 ver.1.01
-
Fujikura: 70S+ Instruction manual · marked 70S+A_Rev1, a copy hosted by a third party
-
Fujikura: 41S Instruction manual · no date shown, a third-party copy of an older model, cited only for the stabilizing discharge count